Pages

Monday, February 17, 2014

How I Clean & Condition My Tack


Alright. Let's talk about it...

Remember in my post HERE, I promised to start taking better care of my tack? Well, it's happening. Seriously. Do you believe me?

A week or so ago, I was at The Horse Expo here in Pomona, CA, and I came across a booth called Rodeo Drive Conchos in their vendor buildings. (Which are VERY dangerous, might I add)

The booth looked like this:
Blurry photo courtesy of their Facebook Page
So, it's hard to see from the photo above, but basically it's a booth with a back wall full of blank tack - headstalls, breast collars, etc. (Some tooled, some not, but all very different styles to choose from) As well as spur leathers, stirrups, keychains, necklaces, dog collars - you name it.

Here's how it works. You pick out your tack, then bring it to the front where they have trays and trays of different color combinations of conchos, all different sizes, shapes, and finishes.  Here, you can play with and design your very own custom tack...yeah, like Build-a-Bear...SO FUN!  My friend and I sat there for what seemed like an hour, switching different conchos out, playing with different buckles, etc. If you're worried about pricing, the girl who was helping us stayed right with us, and updated my order totals every time I added or removed a concho - very nice.

Once I settled on 2 headstalls and a breast collar, she immediately went to work attaching all the conchos - punching holes, tightening them up, she remembered everything I wanted, exactly where I wanted it.  Here's how they all came out:
I shouldn't quit my day job.
OOOHHH AAAHHH!
Oh, that misty morning light! LOL
Nothing too crazy blingy, but bits here and there. Yes, their items were a bit on the higher side ($$), but it has been literally FOREVER since I bought myself some higher quality tack. Something I really fell in love with. NOW, to take care of it. (Ugh)

A few days ago on my Facebook, I asked you all what your favorite leather cleaner/conditioner was...well, here's mine.

Simple, to the point, Effax Leder-Balsam. Available HERE from Amazon, if you're interested. It has consistently great reviews across the board, and contains ingredients like Lanolin, Beeswax, and Avocado Oil (OH WOW! Things I can pronounce!) to help protect and restore your leather.  Funny, the only thing you can't pronounce is the name of the product! HA! I joke, I love you Leder-BLAAAH.

Alright, now that all the players are introduced, let's get into it...here's my cleaning & conditioning routine, step by step!

Step 1: Get all your stuff!  Not shown, but optional - Q-tips & a brown paper grocery bag. I'll tell you later.

Effax Leder-Balsam, rags/towels, tack sponges, and a flathead screwdriver.
Step 2: OK, if this was NOT brand new tack, here's where I'd wipe everything down with a good amount of water, to clean out all the dust out of all of the nooks and crannies so that we have a good starting point, BUT, since this is brand new, I didn't do it today...no pictures. You can handle it. (Let it dry.)

I'd then use a leather CLEANER, to remove any other sweat, hair, dirt, etc that has found its way onto your tack. Wipe off thoroughly, theeeeen....

Step 3: Today I'll start off on this tack by removing all the metal pieces that I can...That means any and all conchos, brackets, etc. This tack is all put together by chicago screws, so easy peasy. Set them all aside, ain't nobody got time to clean oil out of those conchos, if it accidentally gets in there!
Yeah I'm in my pajamas, sue me!
All the purdy conchos...
Step 4: Goop up your tack sponges! This leather didn't bleed, so for this entire job, I was able to use only one sponge - good deal!
Mmmm gooooop.
Whenever I have new tack, I condition it twice before it ever sees a horse. (Well, ok, after fitting it of course) New leather tends to be thirsty, as it has never been oil before, so I seriously apply this stuff. Sometimes leaving a bit of residue left on there, in hopes it will soak it up eventually!

Something I definitely wanted to mention about the conditioner I was raving about...it WILL darken leather a bit. Not a lot, but a bit. I like darker leather anyways, so this has never bothered me, but here's an example of the shade darker that it gets...
Top - Before
Bottom - After
1 application
See? Not bad, but I don't need death threats that I didn't mention this. Anyways...continue with this process of applying the conditioner EVERYWHERE. The good thing is, if you buy actual TACK sponges, they compress to very small, making it easy to cram them everywhere to make sure the conditioner is spread throughout everything.

Step 5: Once everything is coated, I stick it all in a brown paper grocery bag, and shove it in my closet for a couple days. This allows all the goop to be absorbed, and not affected too much by environment, being in that bag. Once it has sat, I pull everything out, and do all the steps over again...one more coat. I know! But your tack will thank me.
As if you didn't know what leather in a bag looked like.
As you work through each piece, I GENTLY bend and flex my leather, working it into the cracks. This will help soften that leather over time too. Hooray!

Back in the bag it goes for another couple days.

Step 6: After what seems like months of waiting, I pull everything out of the bags, and use Q-tips to get any leftover goop out of the punched holes, big cracks, and crevices of the tooling. Handy! Here's a classy picture:
DUH.
If your tack is still a bit goopy, because you went overboard, you can always wipe it all down with the cloths or rags you have....also good for shining and polishing the leather afterwards too. Buff it with the cloth to get these results.

AAAAND you're done! Just go ahead and reassemble everything and haul it to the barn, praying it never gets dirty again.

Just beautiful.
Interested in further information about Rodeo Drive Conchos? Visit their website, where you can see all of their tack, or contact them here, and they can send you a full color, actual size, catalog! Super handy - I grabbed one from their booth when I was there, and will definitely hang onto it.

Happy Cleaning!

The Horse Junkie


**NOT SPONSORED. ALL OPINIONS ARE MY OWN, AND ALL TACK & CONCHOS WERE PURCHASED WITH MY OWN MONEY.**

Wednesday, January 8, 2014

Peppermint Apples Horse Treat Recipe

I wanted to quickly share with you a different type of horse treat for you to try out this weekend. No baking involved, for those who are Martha Stewart Challenged! Easy peasy...

So, let's just dive in - 
SOMEONE needs to clean their grout.
Peppermint Apples
1 large apple
1 shredded carrot
1/2 cup oats
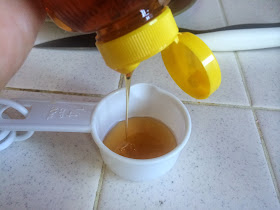
1/4 cup honey
5 tablespoons sugar
1 tablespoon salt
3 crushed peppermints


What to do...

Cut the apples into large chunks. I hope you can handle this. Then I'd suggest towel trying them, so they're not too wet...this will make sense later...right? Then set them aside.

I should be a food photographer.

Mix the honey, peppermints, sugar, and salt in a bowl...I recommend using a spoon!

Are a crazy horse lady's nails ever nice looking?


Oooohhh...texture.

Mix the oats and carrots in a separate bowl. With a separate spoon.

I went with a gladware thing, so I would have to do less dishes later...watch!

Next, coat the apple chunks in the honey mixture and roll in the oat mixture. Seriously, this is kid stuff.

This is why you dried off your apple slices...
so stuff would stick to them! If it's still not, try adding more honey.

Ooooohhh more texture. I was feelin' it, I guess.

Place on a plate or tupperware container (SEEE??) and refrigerate until you feed to horses.  Try not to eat them all before you make it to the barn.
Plastic horse, optional.

Do not let recipe sit for more than a few days...obviously.  The recipe makes plenty for two or more horses, so SHARE! Sheesh.

See? I told you it was a no brainer. I felt silly taking pictures, but it's the internet, you never know who's reading!


See you out on the trail!
The Horse Junkie

Thursday, January 2, 2014

REVIEW: Hairy Back Ranch's "Solo-Ride™"

If you know me at all, you know this white girl can't jump. Even a little.  Lately, AKA the past YEAR, I have been too lazy to use a saddle when riding on trail, or teaching a lesson, etc. so I have been putting some good use into my Best Friend Bareback Pad (Which I love and am obsessed with).  But here's the dilemma...once you're on, you're on. Unless you're off, then you're REALLY off. Picture me finding a hill, wall, rock, log, or whatever is in near proximity to my horse to use to try to get back on - NOT pretty (or graceful).  Let's just say, I have been know to run up a wall, in order to bank off of it and onto my horse. Thank goodness my horses stand still, (lol) but you see my problem?

I think the bareback gods (what?) must have been smiling down on me this month, because recently I was sent a very interesting, but totally genius contraption for ground mounting your horse.

Hairy Back Ranch in BC, Canada, was gracious to send over what they call their "Solo-Ride™". What's that you say? WELLLLL, only the most original and neatest thing to hit the equestrian scene in a LONG time. Seriously.

Such a cute logo!

(All stock images/videos in this review
are pulled from www.hairybackranch.com
with permission)
Their tagline, which describes it perfectly, is "No rock? No fence? No problem! Get back on your horse anywhere, anytime - Solo-Ride™." Umm, YES PLEASE!

Before we do ANYTHING, let's watch an educational video. This girl reads instructions before she does things to avoid making a fool of herself!


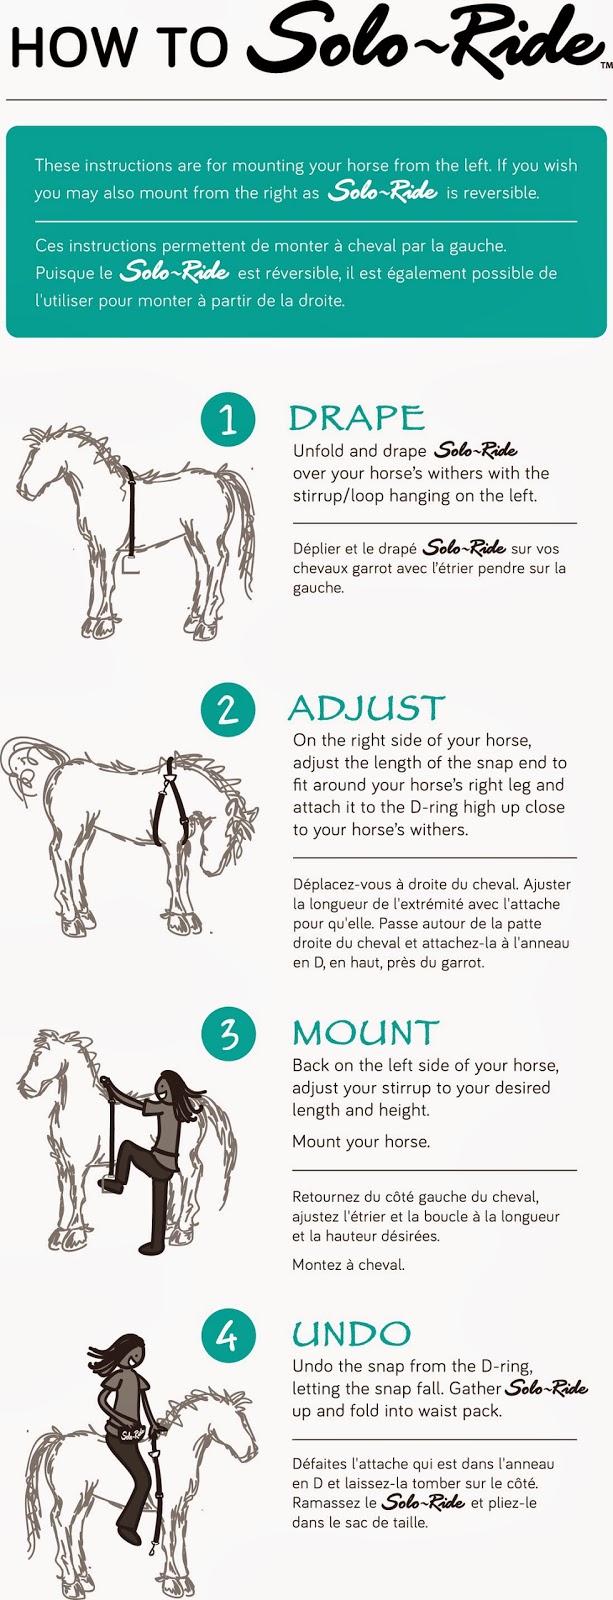
OK, that seems reasonable enough, but just in case, here's a visual that stays put. It's even in French, so we can't go wrong:


First of all, here's what you get in the package:


You get the Solo-Ride™ stirrup, strap, and a fanny pack carrying case.  By the way, it comes in a totally cool printed box, too. I'm a sucker for packaging.
Rio looks THRILLED! Lol

Now let's take it to the streets, and see if we can actually do it! 

Step 1: DRAPE


Step 2: ADJUST
BOOTY SHOT!!


Make sure that padded piece is on the withers.
(What, no joke here??)

Step 3: MOUNT

Lightweight, aluminum stirrup. 
"Umm...what are you doing?"

I told you - style, beauty, and grace!

And with a flick of the tail, I'm on!

Step 4: UNDO

TA DA!


Man, I'm good. I guess!

TRUTH: The only thing I found that bothered me about this, (and it's TOTALLY more of a vanity thing) is that fanny packs are soooo OUT.  But seriously, get over it, Brianne. I just swung it around behind me, kinda like a backwards baseball cap for my booty, and rode on out. SWEET! It's even got reflective printing on it, so I can't complain too much. Safety first!!

Yes, his tail is still multi-colored.
TRUTH: The only thing that bothered my horse model, Rio, is that it was under his armpit, basically.  He danced around the first time I tried it, as it is a totally unfamiliar feeling for him.  I would suggest trying it out in an arena or safe, familiar place, before trusting your horse and taking this waaaay out on trail with you your very first time (I feel like I needed to say that). Also, I looked SO SILLY the first time I tried it. It's something new to get used to, but I picked it up quickly, and so did several ladies in my barn who wanted to try it out. :)  Another note I would like to reiterate, is to make sure the pad is on their withers, making this as comfortable as possible for them!

Convinced you need one yet?? Here are some details.

Where can I buy it?
You can purchase this here: http://www.hairybackranch.com/products/solo-ride

How much does it cost?
$124.99 for the whole package, ships from Canada.

More details please!!
Ooooh...visual.

  • Solo-Ride® is made in Canada
  • Made with 100% heavy duty nylon webbing
  • Hardware is 100% stainless steel
  • Stirrup is polished lightweight aluminum
  • Waist pack is made of durable 600 denier polyester
  • Handle included
  • Wither / under leg comfort pad included
  • Waist pack adjusts to 55 inches
  • Three zippered pockets for extra storage (cellphone and keys fit perfectly - done!)
  • Key ring in pocket
  • Waist pack is embroidered with safety thread


And there you have it!  Overall, I think this product will come in very handy for me, especially. I'm addicted to bareback riding, and this just gave me the last little bit of support I needed! I foresee myself using this a LOT this coming Summer. Thanks, Randell!

Be sure to "Like" Hairy Back Ranch on Facebook to keep up with any news, new products, or sales she will be offering in the future!


Now quick, go shopping!!
The Horse Junkie


**Disclaimer - All products shown here were sent to me for review purposes. All opinions are my OWN!** 
PHOTO CREDIT: ERIN SKOLD